
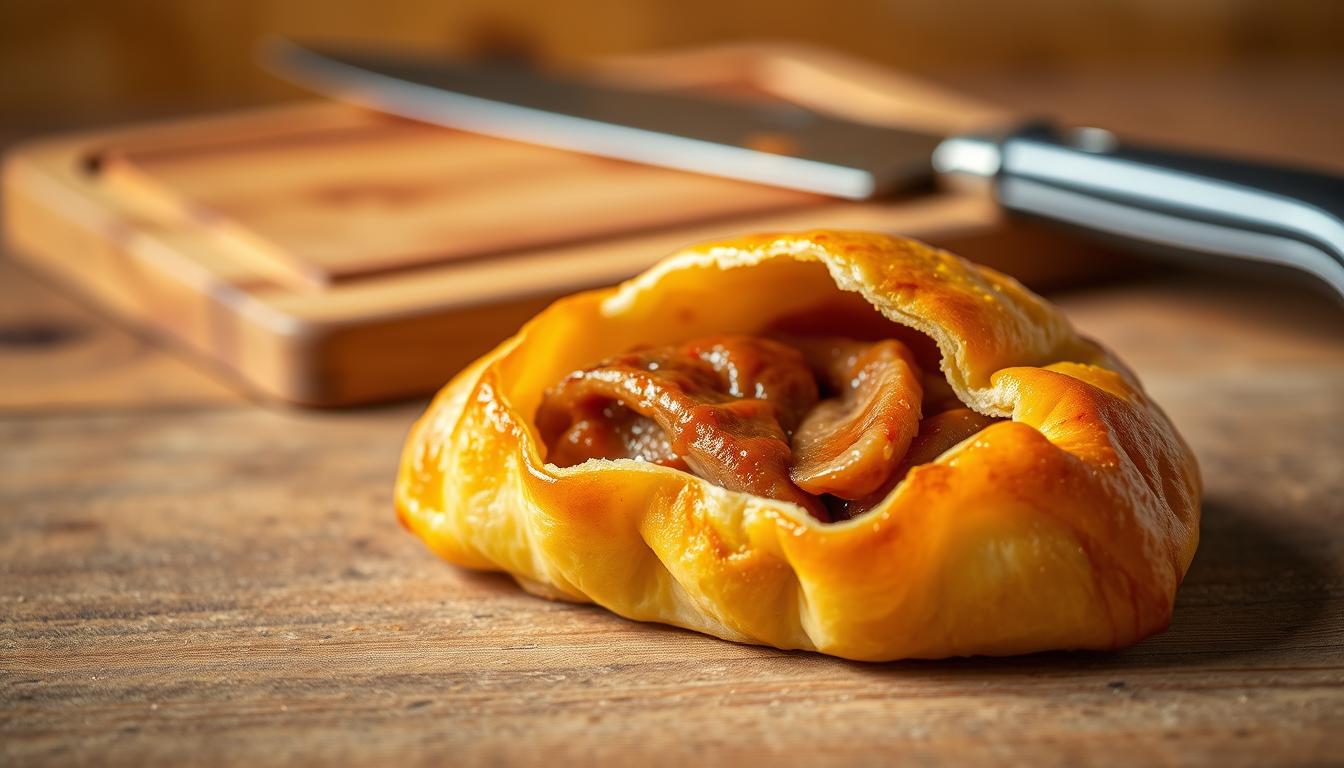
Imagine biting into a golden, flaky treat that melts on your tongue. It has crisp layers and subtle sweetness. This delight is not shaped like a croissant or palmier, but it’s called the ox tongue pastry recipe.
Table of Contents
Despite its name, this pastry has nothing to do with animal parts. It gets its name from its oval shape, like the versatile cut of meat it’s named after. For years, street vendors and home cooks have worked on its texture, balancing crisp edges with tender centers.
This treat is special because of its contrast between simplicity and artistry. Simple ingredients like flour, water, and sugar become extraordinary through careful folding and baking. Traditional recipes use lard for richness, but modern versions use butter for a lighter taste without losing crunch.
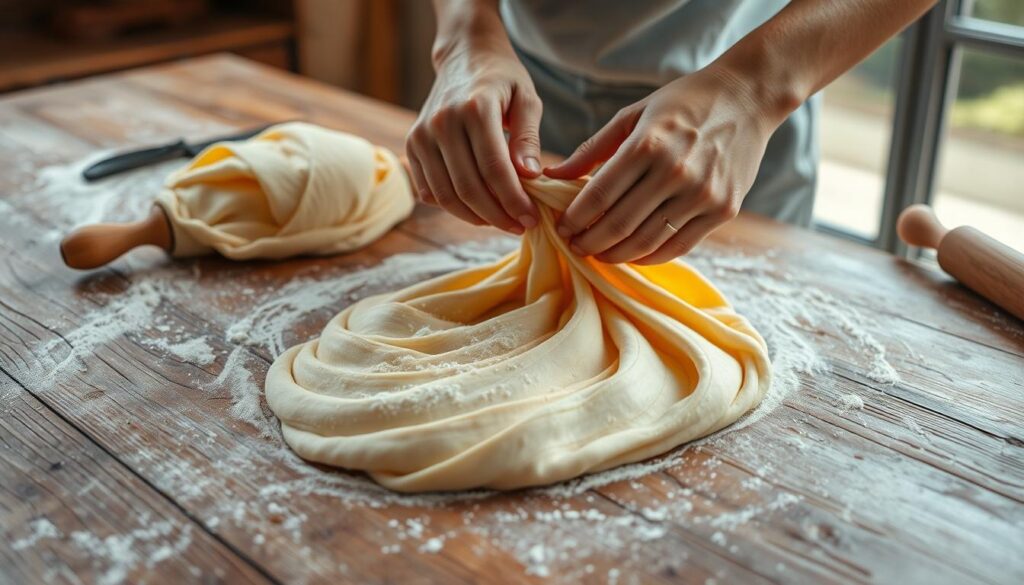
This pastry is great for breakfast, dessert, or snacks. Its magic comes from the dough, rolled thin, brushed with oil, and folded many times. This process is almost meditative, connecting you to generations of bakers.
Ready to see how simple ingredients become something amazing? Let’s explore the secrets of this cultural gem, from measuring flour to baking golden-brown treats.
Discovering the Rich History and Varieties of Ox Tongue Pastry recipe
Every bite of this crispy delight tells stories from Taiwan’s night markets. Bakers there turned flour and water into art, mixing Chinese techniques with local creativity. Unlike other pastries, it doesn’t have sweet fillings, letting its texture shine.
The Taiwanese Influence on Traditional Pastries
Street vendors in the 1950s added maltose syrup for a caramel aroma to the dough. They rolled it thin, brushed it with oil, and folded it 12 times. This method, inspired by scallion pancakes, brought a sweet twist.
Understanding the Unique Shape and Flavor Profile
The oval shape ensures even heat during baking, making it crisp on the outside and soft inside. Different regions have their own styles:
- Taichung’s version is thin like lace
- Southern bakers make theirs thicker with chewy layers
- Modern cafes add matcha or cocoa to the ingredients
Quality is key – using spring water and resting the dough for 30 minutes makes a difference. Despite being less famous, this snack is loved for its perfect mix of crunch and simplicity.
Mastering the Ox Tongue Pastry Recipe
Ready to create magic in the kitchen? Success comes from precision. Every gram and technique is important. Let’s explore the basics for those flaky layers.
Gathering Fresh Ingredients and Essential Tools
You’ll need two main things: water dough (200g flour, 80ml water, 15g sugar) and oil dough (120g flour, 60g oil). You’ll need:
- A digital kitchen scale for exact measurements
- Rolling pin and pastry brush
- Parchment-lined baking sheets
Pro tip: Use chilled butter for the oil mixture. It helps create layers. Spring water is best for gluten development.
Step-by-Step Guide to Creating the Perfect Dough and Filling
First, mix water dough ingredients until smooth. Let it rest 25 minutes. This relaxes the gluten. Then, blend oil dough until crumbly.
Roll the water dough into a rectangle. Place oil dough in the center, fold edges like an envelope, then roll again. Repeat this folding process 6 times, chilling 10 minutes between folds.
For the filling, mix 100g powdered sugar with 50g glutinous flour. Add softened butter gradually until spreadable. Chill 15 minutes before shaping oval portions.
Assemble by wrapping filling in dough sheets, sealing edges tightly. Bake at 180°C until golden – about 18 minutes. The secret? Rotate trays halfway for even color.
Expert Tips for Baking and Presentation
Mastering texture starts long before the oven preheats. The difference between good and exceptional lies in managing three key elements: temperature, timing, and technique. Let’s explore how to elevate your results from homemade to artisan-quality.

Managing Dough Temperatures and Fermentation Times
Keep your dough between 18-22°C for optimal rise. Too warm? Gluten overdevelops, creating tough layers. Too cold? Folding becomes a battle. Use a kitchen thermometer – it’s your secret weapon.
Resting periods matter more than you think. Let the dough relax 25 minutes after mixing. This allows gluten strands to unwind, making rolling smoother. For extra flakiness, chill the oil dough 15 minutes before layering.
Frying Techniques and Finishing Touches
Heat oil to 170°C – test with a dough scrap. It should sizzle gently without smoking. Fry in batches, flipping once edges turn golden. Drain on wire racks to prevent sogginess.
Brush with honey water post-bake for shine, or sprinkle toasted sesame seeds while hot. Uniform shape isn’t just pretty – it ensures even cooking. Use a cookie cutter for consistency if freehand shaping feels tricky.
Remember: Humidity affects flour absorption. Singapore’s climate may require adjusting water by 1-2 teaspoons. Trust the dough’s feel over strict measurements.
Conclusion
The secret to this treat’s magic is patience and precision. Mastering dough hydration and flour quality leads to its crispiness. Remember, resting periods are as important as active baking time. A 30 minute rest can make all the difference.
Success in your kitchen comes from simple choices. Use filtered water for better gluten, and measure sugar carefully. The oil you choose affects both texture and shelf life. Lighter oils keep the results airy.
Don’t be scared of the multi-step process. Once you’ve folded the filling into thin sheets, the oven does its magic. Share your golden treats with coffee or tea. They stay crunchy in Singapore’s humid climate if stored right.
This journey shows that old bread techniques work in today’s kitchens. Keep trying new ingredients and thicknesses. Each batch teaches you something new, turning careful work into delicious art.
FAQ
What makes the shape of this treat distinct?
The oval, slightly flattened shape looks like a cow’s tongue. It’s made by rolling the dough thin, then shaping and frying or baking it.
Can I use alternative sweeteners instead of sugar?
Yes! Try honey, maple syrup, or coconut sugar for a different taste. Just adjust the amount a bit, as some substitutes might change the dough’s texture or baking time.
How do I prevent the dough from becoming too tough?
Don’t over-knead—just mix until combined. Letting it rest for 20–30 minutes relaxes the gluten. This makes the dough tender and flaky after cooking.
What’s the secret to achieving a crispy exterior?
Keep the oil temperature steady (around 350°F) when frying. For baked versions, brush with melted butter before baking. This adds a golden, crunchy finish.
Can I prepare the filling ahead of time?
Absolutely! Store sweet or savory fillings in an airtight container in the fridge for up to 3 days. Let them come to room temperature before assembling for even cooking.
Why is Taiwanese cuisine linked to this dish?
Taiwan’s street food culture made creative versions of traditional snacks popular. Local vendors often add unique spices or fillings, blending old with new tastes.